Winter offers a unique opportunity to capture stunning landscapes, but it also presents several challenges for photographers. From managing tricky lighting conditions to protecting your gear from the elements, these six essential tips will help you take your winter photography to the next level.
Embrace the Golden and Blue Hours
The quality of light can make or break a photograph, and this is especially true in winter. The golden and blue hours, which occur shortly after sunrise and before sunset, offer the most favorable light for winter photography. During the golden hour, the sun casts a warm, soft glow that can add a magical touch to snow-covered landscapes. The blue hour, on the other hand, provides a cooler, more ethereal light that is perfect for capturing the serene beauty of winter scenes.
Consider visiting locations known for their stunning light during these times. In Yosemite National Park, Tunnel View and Glacier Point offer breathtaking vistas during both golden and blue hours, with the warm light illuminating Half Dome and the surrounding valley. Similarly, Banff National Park in Canada, with locations such as Vermilion Lakes and the Banff Gondola, provides stunning opportunities to capture the alpenglow, a rosy-red light that graces the mountain peaks during sunrise and sunset. Arrive early to secure the best vantage points, as these locations can be popular, especially during peak season.
In low-light conditions, a tripod is essential for maximizing light capture and ensuring sharp images. Use a remote shutter release or your camera's self-timer to minimize camera shake. Experiment with different white balance settings to fine-tune the color temperature of your images and achieve the desired mood.

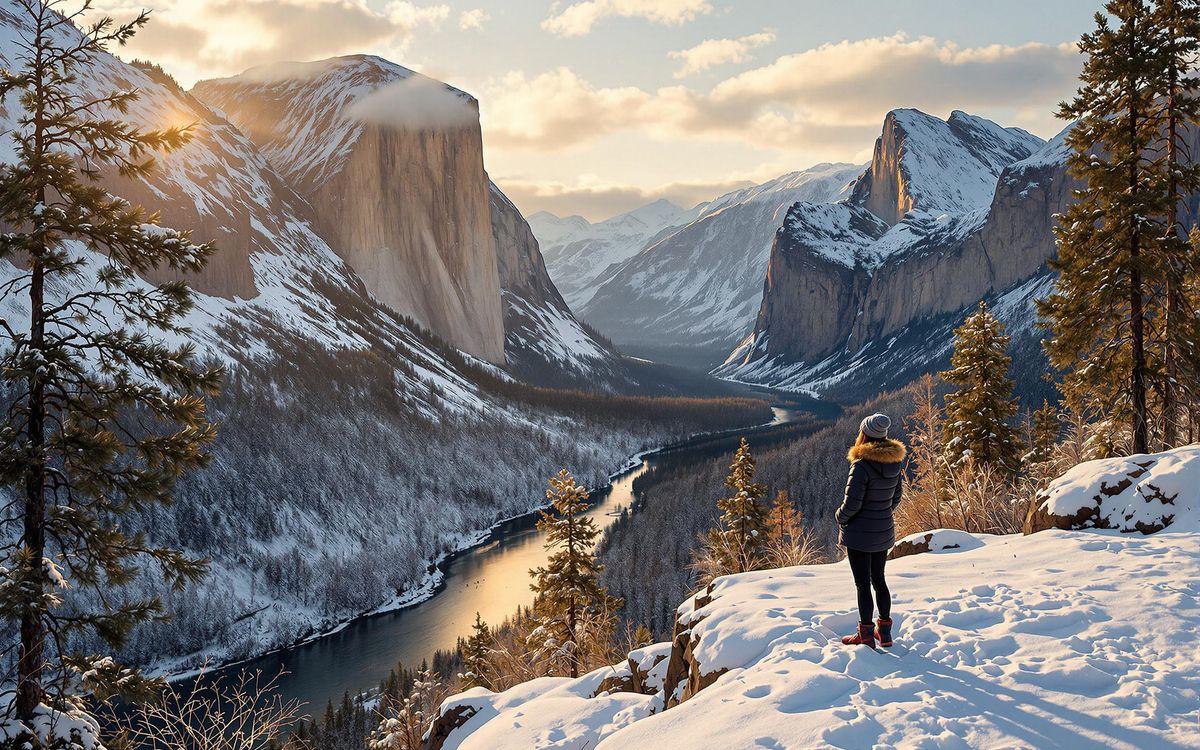
Image Description: A wide-angle landscape photograph capturing the golden hour at Tunnel View in Yosemite National Park. The warm, golden light bathes the snow-covered valley, illuminating El Capitan, Half Dome, and Bridalveil Fall. The scene is serene and majestic, with a few wisps of clouds adding depth to the sky. A lone photographer stands near the edge, capturing the breathtaking view. The overall composition emphasizes the vastness and beauty of the winter landscape.
Style Instructions: Landscape. The photo should be taken on January 7, 2025, during the golden hour (around 7:30 AM PST). Use a wide-angle lens (16-35mm) to capture the expansive view. Set the aperture to f/8 or f/11 for optimal sharpness and depth of field. Use a low ISO (100-400) to minimize noise. A tripod should be used to ensure sharpness. Capture the warm tones of the golden hour and the details in the snow-covered landscape. Minor adjustments can be made in post-processing to enhance the colors and contrast.
Master Exposure Compensation for Perfect Whites
One of the biggest challenges in winter photography is dealing with snow, which can trick your camera's light meter into underexposing images. Snow reflects a lot of light, and your camera interprets this as a very bright scene, leading it to reduce the exposure and make the snow appear gray or dull.
To ensure that snow appears white and bright in your photos, you need to use exposure compensation. This feature allows you to manually adjust the exposure level, overriding the camera's automatic settings. A general rule of thumb is to increase the exposure compensation by +1 to +2 stops, but the exact amount may vary depending on the scene and lighting conditions. Experiment with different settings to find what works best for you.
For example, when photographing the snow-covered landscapes of Hokkaido, Japan, where vast expanses of pristine white snow dominate the scenery, you'll likely need to increase the exposure compensation to capture the true brightness of the snow. Many photography instructors recommend overexposing by +1 1/3 to +2 stops. Without this adjustment, the snow will appear dull and gray, and the overall image will lack the vibrant, crisp feel of a winter wonderland. Pay attention to the histogram to ensure that you are not blowing out the highlights and losing detail in the snow.
Shooting in RAW format is also highly recommended, as it provides greater flexibility in post-processing. RAW files contain more information than JPEGs, allowing you to make more extensive adjustments to exposure, white balance, and other settings without sacrificing image quality.

Image Description: A close-up shot of a snow-covered landscape in Hokkaido, Japan. The scene is dominated by pristine white snow, with subtle textures and contours visible. The lighting is soft and even, highlighting the purity of the snow. The image aims to demonstrate the effect of proper exposure compensation, ensuring the snow appears bright and white without losing detail in the highlights. The composition is simple and clean, focusing on the beauty of the snow itself.
Style Instructions: Macro. The photo should be taken on January 7, 2025, during daylight hours (around 1:00 PM JST). Use a macro lens (e.g., 100mm) to capture the details in the snow. Set the aperture to f/8 or f/11 for optimal sharpness. Adjust the exposure compensation to +1.5 stops to ensure the snow appears white. Shoot in RAW format for maximum flexibility in post-processing. Minor adjustments can be made to enhance the texture and brightness of the snow.
Compose with Contrasting Elements
Winter scenes can sometimes lack visual interest due to the monochromatic palette of white snow and gray skies. To create more compelling winter photographs, it's important to seek out contrasting elements that will add depth, texture, and color to your compositions.
Look for dark trees against white snow, colorful winter clothing, or unique ice formations. Leading lines created by snowdrifts or frozen rivers can also guide the viewer's eye and add a sense of depth to your images. In locations like Lake Pukaki in New Zealand, the turquoise water provides a striking contrast to the snow-capped mountains, creating a visually stunning scene. The deep aquamarine color of the lake, caused by silt particles from glaciers, stands out beautifully against the surrounding white landscape. Consider capturing reflections of the mountains in the lake for an added layer of interest.
Experiment with different perspectives and compositions to find the most visually appealing arrangement of elements. Use the rule of thirds to create a balanced and dynamic composition, and pay attention to the foreground, middle ground, and background to create a sense of depth.

Image Description: A landscape photograph of Lake Pukaki in New Zealand during winter. The turquoise water of the lake provides a striking contrast to the snow-capped mountains in the background. The composition features leading lines created by the shoreline, guiding the viewer's eye towards Aoraki/Mount Cook. The sky is partly cloudy, adding texture and depth to the scene. The overall image captures the serene beauty and contrasting elements of the winter landscape.
Style Instructions: Landscape. The photo should be taken on January 7, 2025, during daylight hours (around 2:00 PM NZDT). Use a wide-angle lens (16-35mm) to capture the expansive view. Set the aperture to f/8 or f/11 for optimal sharpness and depth of field. Use a polarizing filter to reduce glare on the water and enhance the colors. Adjust the exposure compensation as needed to properly expose the snow and water. Minor adjustments can be made in post-processing to enhance the colors and contrast.
Protect Your Gear from the Elements
Winter conditions can be harsh on camera equipment, so it's essential to take precautions to protect your gear from the cold, snow, and moisture. Cold temperatures can drain batteries quickly, so keep spare batteries warm in inner pockets. Consider using weather-sealed cameras and lenses or investing in rain covers to protect your equipment from snow and moisture.
Lens hoods and filters can also help protect the front element of your lens from snow and ice. A microfiber cloth is essential for cleaning the lens, but be gentle to avoid scratching the glass. For added protection, consider using a Promaster Cold Weather Camera Parka, which provides insulation and protection from the elements. These parkas are designed to keep your camera dry, your batteries warm, and your hands comfortable while shooting in challenging conditions.
When moving from cold to warm environments, condensation can form on your camera and lens, potentially damaging the internal components. To prevent this, place your camera in a sealed plastic bag before bringing it indoors and allow it to gradually warm up to room temperature.

Image Description: A close-up shot of a camera with a lens, protected by a Promaster Cold Weather Camera Parka in a snowy environment. The parka is covering the camera, with only the lens slightly visible. Snowflakes are gently falling around the camera, emphasizing the harsh winter conditions. The image focuses on the protective gear, highlighting its importance in safeguarding camera equipment from the elements. The overall composition is practical and informative.
Style Instructions: Macro. The photo should be taken on January 7, 2025, during a snowy day (around 11:00 AM local time). Use a macro lens (e.g., 100mm) to capture the details of the camera parka and the snowflakes. Set the aperture to f/5.6 or f/8 to create a shallow depth of field, focusing on the parka and lens. Use natural light to illuminate the scene. Adjust the white balance to accurately capture the colors of the parka and snow. Minor adjustments can be made in post-processing to enhance the details and contrast.
Dress in Layers for Comfort and Dexterity
Staying warm and comfortable is crucial for enjoying winter photography and maintaining the dexterity needed to operate your camera. Dressing in layers is the most effective way to regulate your body temperature and stay comfortable in a variety of conditions.
Start with a moisture-wicking base layer, such as merino wool, to keep sweat away from your skin. Add an insulating mid-layer, such as fleece or down, to trap heat. Finish with a waterproof and windproof outer layer to protect yourself from the elements. Photography-specific gloves, such as those from Vallerret Photography Gloves, are designed to allow for easy camera operation while keeping your hands warm. These gloves often feature flip-tech finger caps, allowing you to expose your fingertips for precise control of your camera's dials and buttons. Brands like Haukland clothing offer jackets and vests with photographer-friendly features like lens cloth pockets and ample storage for batteries and memory cards. Don't forget warm socks, waterproof boots, and a hat or balaclava to protect your extremities.
Consider bringing hand warmers for extra warmth on particularly cold days. Staying comfortable will allow you to focus on your photography and capture the best possible images.

Image Description: A lifestyle photograph of a photographer dressed in layered winter clothing, including a Haukland jacket and Vallerret Photography Gloves, standing in a snowy landscape. The photographer is holding a camera and adjusting settings, demonstrating the ease of use with the specialized gloves. The scene is set in a picturesque winter environment, with snow-covered trees and mountains in the background. The overall image conveys the importance of comfortable and functional clothing for winter photography.
Style Instructions: Lifestyle. The photo should be taken on January 7, 2025, during daylight hours (around 10:00 AM local time). Use a mid-range zoom lens (e.g., 24-70mm) to capture the photographer and the surrounding landscape. Set the aperture to f/4 or f/5.6 to create a shallow depth of field, focusing on the photographer. Use natural light to illuminate the scene. Adjust the white balance to accurately capture the colors of the clothing and the snow. Minor adjustments can be made in post-processing to enhance the details and contrast.
Experiment with Shutter Speed to Capture Snowfall
Falling snow can add a magical touch to winter photographs, but the way you capture it depends on the shutter speed you use. A fast shutter speed (1/250s or faster) will freeze individual snowflakes, creating a crisp and detailed effect. This technique is ideal for capturing the texture and beauty of the snowflakes themselves.
On the other hand, a slow shutter speed (1/30s or slower) will create a dreamy, motion-blurred effect, conveying the sense of movement and atmosphere. This technique is particularly effective in creating a sense of depth and dimension in your images. Try this technique in a snowy location like a Christmas tree farm in Spokane, Washington, where the falling snow can create a festive and enchanting atmosphere. Many farms, such as Theodore's Thicket and Greenbluff Tree Farm, offer picturesque settings for capturing snowy scenes.
When using slow shutter speeds, a tripod is essential for stability and sharpness. Experiment with different shutter speeds to find the effect that best suits your creative vision.

Image Description: A photograph taken at a Christmas tree farm in Spokane, Washington, with falling snow. The scene is captured using a slow shutter speed, creating a motion-blurred effect of the snowflakes. The Christmas trees are softly illuminated, and the overall image conveys a dreamy and festive atmosphere. The composition focuses on the falling snow and the surrounding winter wonderland.
Style Instructions: Street. The photo should be taken on January 7, 2025, during a snowy day (around 3:00 PM local time). Use a standard zoom lens (e.g., 24-70mm) to capture the scene. Set the aperture to f/5.6 or f/8 to create a shallow depth of field. Use a slow shutter speed (1/15s to 1/30s) to create a motion-blurred effect of the snowflakes. Use a tripod to ensure stability. Adjust the white balance to accurately capture the colors of the scene. Minor adjustments can be made in post-processing to enhance the dreamy effect.